

Thursday, April 5, 2018

Monday, March 5, 2018
Common Shapes, Complex Designs

Join us Saturday, March 10 for our monthly guild meeting.
Ann Hurley, Camille Miller and Martha Steele will help us explore ways to use common/simple shapes to create complex designs for modern quilts.
We’ll look at straightforward patterns and examine ways to restructure them into more interesting and complicated creations.
This program includes a hands-on exercise, so please bring the following items:
- Scissors (for cutting paper)
- Pencil
- Ruler
- Glue stick
Sunday, March 4, 2018
February 2018 Recap
This month we shared our favorite notions for cutting, sewing and quilting. Plus, two ChattMQG members traveled to QuiltCon in Pasadena, and we learned about two upcoming regional quilt shows.
Go-To Gadgets & Tools
"I can't believe you brought drug paraphernalia to our guild meeting!" someone exclaimed in jest. To say our meeting on our favorite quilting gadgets took an unexpected turn is an understatement. And no, we don't condone illicit activities, but a couple of unconventional tools gave us a good chuckle.
For Hand Quilting
Better known as a surgical tool, a hemostat can be a hand quilter's best friend. It pivots like scissors but does not cut. Instead, a set of interlocking teeth below the handles lets you control the gripping force of the tip.
Catherine Price recommends clamping it onto a needle to pull the needle through thick quilt layers with ease. Following her informative show-and-tell, another quilter (who shall remain anonymous to protect her identity) proclaimed, "That's a roach clip!" To each her own.
 |
| This surgical tool can be very useful for hand quilting. |
Catherine Price recommends clamping it onto a needle to pull the needle through thick quilt layers with ease. Following her informative show-and-tell, another quilter (who shall remain anonymous to protect her identity) proclaimed, "That's a roach clip!" To each her own.
Other tools recommend for hand quilting include:
- Colonial Leather ThimblePad, used by Sara to stabilize a thimble (it can also be worn in place of a thimble)
- Clover Embroidery Threader, to easily thread needles with perle cotton
- Self-threading needles
At Your Machine
Rhonda Fulghum shared a very handy tip: convert your favorite paperback quilting books to spiral-bound! This makes it easier to open them to specific pages while you’re learning a new technique.
 |
| You can turn any paperback book into a spiral-bound book, just visit your local print shop. |
Rhonda also praised the handmade stiletto she received from Jean Larson, who used a large darning needle and Fimo Polymer Clay to make it.
 |
| Jean made this stiletto with a darning needle and Fimo clay. |
Other handy tools to keep by your machine include:
- Zirkel Magnetic Pincushion
- That Purple Thang
- Clover Roll & Press (great for paper-piecing)
- A telescoping back scratcher, for the days when there is no one around to help you reach that one spot.
For Cutting and Trimming
A somewhat unconventional idea came from Sherry Leary: use a Quick-Grip clamp from the hardware store to lock your fabric into place when cutting long strips. Sherry stacks her cutting mat, fabric, and ruler along the edge of a table and clamps all three into place to prevent any shifting.
 |
| Sherry uses clamps like this to hold fabric in place for cutting. |
Other useful cutting tools include:
- Titanium rotary blades
- Karen Kay Buckley adjustable rulers (perfect for traveling to quilt retreats!)
- Creative Grids Stripology Squared Ruler (great for cutting binding strips)
- Quarter inch seam marker
To Make Free-Motion Quilting Easier
If you tend to shy away from quilting without a walking foot, several items can make free-motion more fun and less stressful. Denise Ohlman uses a Quilt Halo for support and control when she does FMQ; Catherine recommends a similar tool called Martelli Gripper Rings. Batt Scooters by Paula Reid can also help you keep a good grip on your quilt sandwich while it's under the needle.
Miscellaneous
- Directional/numbered pins, to organize your cutting/piecing piles
- Kwik Klip, to save your fingers during basting
- Clover Hera Marker, to mark your quilt top without the use of ink or chalk
- Quilter's Assistant Proportional Scale, to easily resize blocks
Blue Ribbon Winner
Congratulations to Mary Keasler, who won two first-place ribbons at this year's QuiltCon in Pasadena, California. She took the top prize in the American Patchwork & Quilting Flying Geese category for her quilt titled "Free Motion", and her "Mountain Town" quilt won the Small Quilts category. Click here to see all of this year's winning quilts.
 |
| Mary Keasler and her award-winning quilt "Free Motion" |
Kelly Spell also had a quilt juried into the show. Her "Humuhumunukunukuapua'a" quilt was exhibited in the Small Quilts category.
 |
| Kelly Spell and her quilt "Humuhumunukunukuapua'a" |
Upcoming Quilt Shows
Speaking of quilt shows, there are two shows scheduled in the coming weeks that are an easy drive from the Chattanooga area.
- Fiber Arts & Art Quilts at Cleveland Workspace: Friday, March 9 from 5:30 p.m. to 8:30 p.m. and Saturday, March 10 from 11 a.m. to 4 p.m. Cleveland Workspace is located at 445 Church Street in Cleveland, TN. Contact Karen Downer for more information. This exhibition coincides with "Stitches in Time" at the Museum Center at Five Points.
- Original Sewing & Quilt Expo: Thursday, March 8 through Saturday, March 10 at the Infinite Energy Center in Duluth, GA. Exhibit hall hours are from 10 a.m. to 6 p.m. Thursday and Friday, and 10 a.m. to 5 p.m. Saturday.
Recognition for Charity Work
We want to take a moment to recognize the work of Sara Bradshaw, a retired police officer and guild member who is working on quilts for Operation Underground Railroad (O.U.R.). The organization rescues victims of sex trafficking, and Sara committed to send 10 quilts to O.U.R. this year. The first group recently arrived at O.U.R. and the organization wrote a blog post about the donation. Sara's enthusiasm for the cause encouraged several guild mates to join her effort, and comments on the O.U.R. blog post indicate interest among quilters around the country. Bravo!
Habitat for Humanity
In addition, Sara sits on our newly formed Community Service Project Committee. She, Beverly Herron and Camille Miller will oversee the guild's work with Habitat for Humanity of Greater Chattanooga Area this year.
Last month, Sara completed a quilt top using brick blocks made by members for several 2017 Habitat quilts. It is in the queue to be quilted and will be donated to a homeowner later this year.
And Beverly volunteered to quilt a top she made; it was bound and labeled by Denise, who presented it to a homeowner during Habitat's first dedication ceremony of 2018. Stay tuned for more pictures!
Last month, Sara completed a quilt top using brick blocks made by members for several 2017 Habitat quilts. It is in the queue to be quilted and will be donated to a homeowner later this year.
 |
| Sara (left) and Karen (right) hold the quilt top Sara completed for a 2018 Habitat homeowner. |
 |
| Beverly made this top and quilted it for a Habitat homeowner. |
Show and Tell
Monday, February 5, 2018
Go-to Gadgets and Tools

What are your go-to gadgets and tools when you’re piecing or quilting—the items you need close at hand to ensure success?
Look around your sewing room: do you have a favorite ruler, or a certain pair of scissors that is cut above the rest? Perhaps the one thing that helps you work most efficiently came from a hardware store instead of a LQS, or maybe you hacked it together DIY-style because it doesn’t exist on the market.
Join us Saturday, Feb. 10 at 10 a.m. as we discuss our favorite tools at our monthly guild meeting. Bring one or two of your go-to gadgets for an informative show-and-tell session, and don’t forget a pen and paper so you can write down others’ recommendations.
See you there!
Friday, January 26, 2018
January 2018 Recap
The new year started with a bang! ChattMQG members' work was featured in books, a magazine, and a local quilt show; plus, we launched a new quilt challenge.
It’s Time to Cut It Up! (Again)
Anticipation filled the air at our January meeting as we prepared for an opportunity to breathe new life into a fellow member’s once-prized but now-neglected project. Participants were asked to bring at least one unfinished object to be part of this year's rendition of the popular Cut It Up! Challenge: UFOs, orphan blocks, and several quilt tops adorned two tables.
 |
| Challenge participants examine the UFOs, orphan blocks, and quilt tops up for grabs. |
Instead of focusing our efforts on a single group quilt, this go-round we’re working on individual projects. To start, each participant did a brief show-and-tell about the unfinished project she brought to the table. After we got a closer look and a chance to fondle the fabric, we drew numbers and divvied up the items White Elephant-style. There was quite a bit of stealing involved in the process!
Everyone left the meeting with someone else’s item(s) to cut up and use to create a new, modern quilt. You can see each item in the slideshow below: the original owner is pictured on the left, and the sewing surgeon is pictured on the right.Everyone has five months to complete the challenge and there are no size requirements for the finished quilts, which will be unveiled at our June meeting. Please share your progress as you work! Use the hashtag #chattmqgcutsitup on Instagram and post your pictures in our Facebook Group.
Quilts Exhibited at Local Gallery
Also in January, eight ChattMQG members exhibited their work at Scenic City Clay Arts' Gallery f 2232°.
 |
| Quilts on view at Scenic City Clay Arts |
The show, titled "Face Jugs and Quilts of Modern Day Appalachia", was organized by local artists Carrie Anne Parks and Lolly Durant as part of a Hamilton County Schools in-service day for art teachers. Parks and Durant heard about ChattMQG from member Sherry Leary, and they invited the guild to feature members’ quilts alongside the work of potters Mark Issenberg and Shelby West.
The timeline for submission was tight, and it happened at the height of the holiday season, but the result was a vibrant, colorful display that offered viewers a delightful juxtaposition of hard and soft art forms. Partnering with other artists for a local show proved to be a great success! In an article by the Times Free Press, Parks described the quilts as, “really like paintings, the way the [quilters] are working with color and forms. They are doing interesting things with their stitchery and adventurous things with their quilts.”
Congratulations, everyone!
Members' Work Featured in Books and a Magazine
Meanwhile, several members recently had their work shared on an even larger scale.
Veronica Hofman-Ortega’s “Listen” quilt, which was part of the show at Scenic City Clay Arts, is featured in a new book by Melissa Averinos called Making Faces in Fabric. Check it out on page 105 in the gallery of student work.
And Mary Keasler’s award-winning quilt “Not Easy Being Green” can be seen on page 179 of The Modern Quilt Guild’s new book Modern Quilts: Designs of the New Century. That piece earned Mary the ribbon for Best Machine Quilting (Frameless) at last year’s QuiltCon.
Finally, Audrey Workman’s “Log Cabin Jamboree” is featured on page 81 in the Log Cabin issue of Curated Quilts. CQ is a new, quarterly journal that features a gallery of quilts on a specific theme. For each issue, the magazine puts out a call for entries for mini quilts; quilters must adhere to a specific color palette and strict size requirements in order to be selected for publication.
Bravo, ladies!
Tuesday, January 23, 2018
How to Make Award Ribbons

Are you looking for an easy way to make quilt show ribbons? Don’t want to do the math or make a special run to the store for supplies? This tutorial will show you how to make simple and customizable award ribbons using fabric and other items you probably already have in your sewing room.
But first, a little background.
In 2016 and 2017, ChattMQG presidents Audrey Workman and Kelly Spell issued challenges to members to make quilts for two end-of-year shows that hung during the guild’s December meetings. Inspired by the gorgeous QuiltCon ribbons made by Nicole Daksiewicz of Modern Handcraft, Audrey made several ribbons for her 2016 President’s Mini Quilt Challenge — you can see one here:

Thankfully, Audrey kept copious notes as she went along. In 2017, Kelly made some minor edits as she made the ribbon for her Curves Challenge. The following instructions are a mashup of their processes.
What You Need
The following items will make one award ribbon measuring approximately 4.5” wide and 9.5” tall. As you select your fabrics, keep in mind that award ribbons are a great scrap-busting project!
- One 3” x 16” strip of fabric for the outer ruffle
- One 3” x 12” strip of fabric for the inner ruffle
- Two 4” x 4” squares of white fabric for the center badge
- Two 1 3/4” x 14” strips of fabric for the outer ribbons
- One 1 3/4” x 14” strip of fabric for the inner ribbon
- One 1” pin back
- White stiffened felt (or ultra firm stabilizer) for the badge backing
- Freezer paper
- Iron-on interfacing
- Plain printer paper
- Glue stick
- Hot glue gun or craft glue

Center Badge
To start, you need to design the graphic you want to print on your center badge. This can be a logo, simple text, or a combination of the two. If you’re proficient in Adobe Illustrator, Photoshop, or a comparable software program, use that. If not, we recommend Canva.com, a free graphic-design website that is very easy to use.
Create an account and then use Canva’s custom dimensions feature to create a blank 3” x 3” canvas. For the Curves Challenge ribbon, Kelly added a light gray circle to the canvas and centered the text inside it.

Once you’re satisfied with your graphic, save it to your computer and prepare for printing. If you have a button maker, you can print your graphic on paper and use the button maker to create your center badge. If you don’t have a button maker, don't worry. Follow these steps to make your center badge out of fabric.
Grab the freezer paper and one 4” x 4” square of white fabric. Place the shiny side of the freezer paper against the wrong side of the fabric and press with a hot iron. The freezer paper will temporarily stick to the fabric and stabilize it for printing.

Next, lightly glue the whole thing to a piece of plain printer paper—the right side of the fabric is facing up, and the freezer paper is now stuck to the printer paper. You’re ready to print your graphic onto fabric! Check your printer settings and make sure you print your graphic at 100 percent scale.
After printing, peel the fabric off the freezer paper and apply a medium-to-heavy weight interfacing to the wrong side of the fabric. Then place it on top of the second 4” x 4” square piece of white fabric (right sides together) and sew a circle, using the grey outline of the graphic as a guide. Trim the seam allowance so it is a scant 1/4” around the circle, and clip it. Use scissors to cut a slit in the plain white backing fabric, then turn the right side out through the hole.
Voila! Set it aside.

Outer Ruffle
Take your 3” x 16” strip of fabric, fold it in half along the long edge with wrong sides together, and press. Use your favorite method to gather the fabric into a ruffle (we like the machine method demonstrated here), and shape it into a circle with the raw edges on the inside. Tie your basting threads into a knot to hold the circle in place, then set aside.
Inner Ruffle
Take your 3” x 12” strip of fabric and follow the instructions above to create the inner ruffle. Place the outer ruffle on a table with the right side facing up, and center the inner ruffle on top of it with the right side facing up. Pin the two ruffles in place and then sew a basting stitch around the inner circle to hold them together.

Ribbons
Now it’s time to make the ribbons. Gather one 1 3/4” x 14” strip of fabric and fold it in half along the short edge with right sides together. Starting at the folded edge, sew a scant 1/4” seam down each side to create a tube; backstitch at the beginning and end of the seam. Turn the tube right-side out and press. Repeat for the other two ribbons, then arrange all three in the manner you want them to hang, and baste them together.

Badge Backing
Grab your white stiffened felt and draw two circles approximately 2.5” in diameter. (The bottom of a large basting spray can is the perfect size for tracing!) Cut out the circles and set aside.

Assembly
You’re almost finished! To assemble the ribbon, gather the following items: the outer and inner ruffles, the center badge, the felt badge backing circles, the basted ribbons, a pin back, and glue.

Position the ribbons on top of one felt circle and baste them into place. Then add several dabs of glue to the ribbon-basted circle and place the second felt circle on top of it, sandwiching the ribbons in between; use clips or a heavy book to hold the pieces in place while the glue dries.

Now add several dabs of glue to the inner ruffle, right on top of the basting stitches, and place the center badge on top of it with the right side facing you. Press the pieces to bond them together, and set aside to let the glue dry.
Finally, glue the ruffle unit to the right side of the ribbon unit. Once it is dry, glue the pin back to the back side—now your ribbon is ready to hang!

Customization
Once you complete one ribbon, you will likely be inspired to add your own customizations. You can add ribbons to the back of the center badge (as Audrey did in 2016), enlarge the overall size of the ruffles, and more—the possibilities are endless.
We hope this tutorial was helpful! If you have any questions, let us know in the comment section.
Tuesday, January 2, 2018
Let's Cut It Up! (Again)

Instead of focusing our efforts on a single group quilt, we're going to work on individual projects. And we won't cut up completed quilt tops; for this reboot, we'll breathe new life into UFOs and orphan blocks.
To participate, search your sewing room for one or two incomplete projects and bring them to our January 13 guild meeting. Each participant will do a brief show-and-tell about their item(s), and then we'll draw numbers and divvy them up white-elephant style.
That's right: you'll go home with someone else's UFO or orphan blocks to cut up and use in the creation of a new, modern quilt. And a fellow participant will take yours home to rework. Everyone has five months to complete the challenge; finished quilts will be unveiled at our June meeting. I look forward to seeing the results!
Thursday, December 21, 2017
December Meeting Recap
Laughter and delicious smells filled the air as we marked the end of another year with a potluck party, mini quilt show, and gift exchange.
Curves Challenge
 |
| Six quilts were made for the Curves Challenge |
Six members submitted work for the Curves Challenge, and their work decked one wall of the meeting room. In September, members were asked to create an original design using black, white, and one color of their choice. The style and techniques used were up to each individual maker, but the end result had to fit within the curves theme.
 |
| Vista Mahan and her winning quilt |
Vista Mahan took home the viewer’s choice ribbon for her “Ocean Currents” mini quilt. Vista selected Kona Cotton Pool as her third solid; the name of the fabric inspired her watery landscape, which includes a combination of hand and machine quilting.
Kudos to Vista, Gerry Haywood, Audrey Workman, Stephanie Quesinberry, Theresa Kitchell and Jean Larson for tackling the challenge and creating stunning mini quilts!
And many thanks to our 2017 officers and steering committee! Your dedication and hard work are greatly appreciated.
Kudos to Vista, Gerry Haywood, Audrey Workman, Stephanie Quesinberry, Theresa Kitchell and Jean Larson for tackling the challenge and creating stunning mini quilts!
And if you’re interested in making your own quilt show award ribbons, stay tuned for a tutorial coming in the next few weeks.
2018 Calendar and Programs
After a successful brainstorming session in November, the steering committee took your ideas for next year’s programs and used them to create the following calendar. The topics listed in red will be taught by small groups of members listed in parenthesis; if you haven’t signed up for a group, let me know which topic piques your interest and I’ll gladly add your name!
- January 13: Cut It Up! (Again) — We’re bringing back the popular Cut It Up! Challenge but with a twist. This time we’re focusing on UFOs and orphan blocks instead of a completed quilt top. Search your sewing room and bring 1-2 incomplete projects to the January meeting; someone else will take your work home, cut it up, and make something new with it.
- February 10: Go-To Gadgets & Tools
- March 10: TBD
- April 14: TBD
- May 12: Hand Quilting (Sara Bradshaw, Ava Moore, Catherine Price, Patricia Steadman, Audrey Workman)
- June 9: Cut It Up! (Again) quilt show and Brown Bag Fabric Challenge launch
- July 14: Using Common Shapes to Create Complex Designs (Ann Hurley, Camille Miller)
- August 11: Binding and Finishing Techniques (Karen Downer, Carolyn Pugh)
- September 8: Alternative Materials for Modern Quilts (Theresa Kitchell, Stephanie Quesinberry)
- October 13: Scrap Buster Sew-In
- November 10: 2019 Brainstorming
- December 8: Holiday party and Brown Bag Fabric Challenge quilt show
2018 Officers & Bylaws
The steering committee recently adopted revised bylaws for the guild. The biggest changes are that we increased the number of named officers, clarified the nomination process for new officers, and formalized procedures concerning guild finances. I encourage you to read the revisions and let me know if you have any questions.
Leading the guild in 2018 are the following officers:
- President & Communications Coordinator: Kelly Spell
- Treasurer: Vanessa King
- Secretary: Patricia Steadman
- Membership Coordinators: Stephanie Quesinberry and Karen Downer
And many thanks to our 2017 officers and steering committee! Your dedication and hard work are greatly appreciated.
- President: Kelly Spell
- Treasurer: Jean Larson
- Secretary: Denise Ohlman
- Steering Committee: Veronica Hofman-Ortega, Mary Keasler, Sandi Suggs, Audrey Workman
Show and Tell
Saturday, December 2, 2017
It's Time to Party!

Join us Saturday, Dec. 9 at 10 a.m. for our annual holiday party and mini-quilt show! Please bring a food item to share, show-and-tell, and a handmade gift if you want to participate in a gift exchange.
In addition, please bring a check for your 2018 dues of $35 made payable to Chattanooga Modern Quilt Guild. We have a lot of great programs in the works for 2018, I'll explain them in detail Saturday.
See you then!
Thursday, November 30, 2017
A Big Finish to Close Out 2017
“Mosaic Garden never looked so good!” That was one of several compliments I overheard last month when we unveiled the completed quilt from our Cut It Up! Quilt Top Challenge.
 |
| The end result of our Cut It Up! Quilt Top Challenge |
The quilt started its life several years ago as traditional top, sewn by guild member and fabric sales rep Veronica Hofman-Ortega to highlight a fabric line she was selling at the time. She donated it to the guild to use as a learning tool to reinforce design ideas presented by Mary Kerr during a lecture and workshop in April. (Kerr specializes in antique textiles and recently wrote a book on incorporating vintage pieces into modern quilts.)
After a design session at our June meeting, we settled on Vista Mahan’s plan to refashion Veronica’s quilt top. (Check out all of the designs we created here.) Using Affinity Photo software, I digitized Vista's paper design and added sections of solid stripes to increase the overall quilt size. Then during a July sew-in, several members took a rotary cutter to Veronica’s top and reassembled it adding strips of white, yellow, red, blue, green, and purple. You can see each stage of the process below.
Beverly Herron volunteered to tackle the quilting on her longarm machine, and she chose a lovely design that mimics the mosaic swirls printed on the fabric. I finished the quilt with a bright yellow binding that really pops.
 |
| The quilting was done by ChattMQG member Beverly Herron |
Our original plan was to donate the quilt to a Habitat for Humanity homeowner, but we were very ambitious this year and ended up with more quilts than Habitat had homeowners! So stay tuned for the final plan. Thanks again to Veronica for donating the original quilt top, and to everyone who helped design and assemble the remix.
Are you interested in reviving this challenge in 2018? Let me know in the comments!
Sunday, November 12, 2017
November Meeting Recap
Storming Brains Pummel Easy Approaches
As the third annual November brainstorming process began, we could feel a shift in the wind energized by new ideas. What do we want to learn about in 2018? |
| While this picture isn't very exciting, the results of our brainstorming session give us a lot to anticipate! |
We know there's more gold down there, and we aim to find it and dig it out.
Top Votes Go Here
Our members—confident at making quilt tops—are eager to reach beyond straight lines and master free-motion quilting on our domestic machines in 2018. We want to learn how to create complex designs from common shapes. We want to figure out how to design quilts with the minimum amount of seams. Another popular idea was binding and finishing art quilts (please check our Archived Post from May 2015 to find links that will get you started).Runners-up for possible 2018 program topics included quilting with alternative materials; exploring texture, color, and repetition; and solving problems.
Who's Up for a Field Trip?
Other ideas generated during our brainstorming session included visiting an art museum, inviting an art teacher to walk us through design concepts, hosting retreats, continuing popular sew-ins, and even impromptu gatherings in restaurants. Fun!
Self-Analysis Reveals We Continue to Grow in Confidence
We also continued our annual tradition of rating ourselves on our confidence level as modern quilters. Veronica's graph says it all!

Thanks to everyone who showed up to participate and offer ideas for our upcoming programs. We appreciate you! And thanks to Veronica for leading us in another successful session.
Mini Quilts with Big Personalities
Finally, it was Christmas in November as Camille (Ms. Claus?) passed out wrapped packages from our new friends in the Tucson Modern Quilt Guild. Our #AZtoTNswap resulted in lots of lovely work, check out the minis received by some of our participants:
 |
| Camille, Samantha, Karen D., Kelly, Denise and Sara show off the mini quilts they received from their swap partners. |
Show and Tell
Monday, November 6, 2017
Program Planning for 2018

Join us Saturday, Nov. 11 at 10 a.m. for our third-annual brainstorming session! This is your opportunity to pitch ideas for program topics and guide the guild's direction for the coming year.
Bring your ideas and your enthusiasm, as well as your Curves Challenge mini quilts for our December show. And get excited, because I'm going to reveal three big group-quilt finishes during show-and-tell.
I'll see you Saturday!
Tuesday, October 31, 2017
October Meeting Recap
Computer Software for Quilt Design
 |
| A screenshot of a design created by Carolyn R. in Electric Quilt 7 |
Try an App
Stephanie has a phone with her most of the time and uses two apps, Infinite Design and Infinite Painter, to help get ideas out of her head and into a sketch before she forgets them. Both apps are made for Android devices. Draw with your finger, work from a photo, use layers--all the familiar tools are there in a convenient, free package. |
| These are a few of the sketch tools available in Infinite Painter. |
Several design apps are also available from Adobe; Stephanie showed us how to "paint" and create shapes using Illustrator Draw and Photoshop Sketch. They work on Apple and Android devices, enabling you to sketch on the go and send your drawings to your desktop computer for further refinement.
 |
| Stephanie also showed us some of Adobe Photoshop Sketch's design capabilities. |
Most mobile apps won't take you directly from idea to quilt, but they are portable and tend to be free or inexpensive. No need to carry a sketchbook! Click here to see Stephanie's entire presentation.
Use Pro Software
Next we saw a demo of Electric Quilt, a recent version of which is known as EQ7. Carolyn took the sketches we sent Jean last month and transformed them into digital designs using this popular quilting software. Her interpretation of Audrey's sketch (which was inspired by Anthony Quigley's photograph of the Kuala Lumpur International Airport) is featured below, and you can see more of Carolyn's work by clicking this link to her slideshow.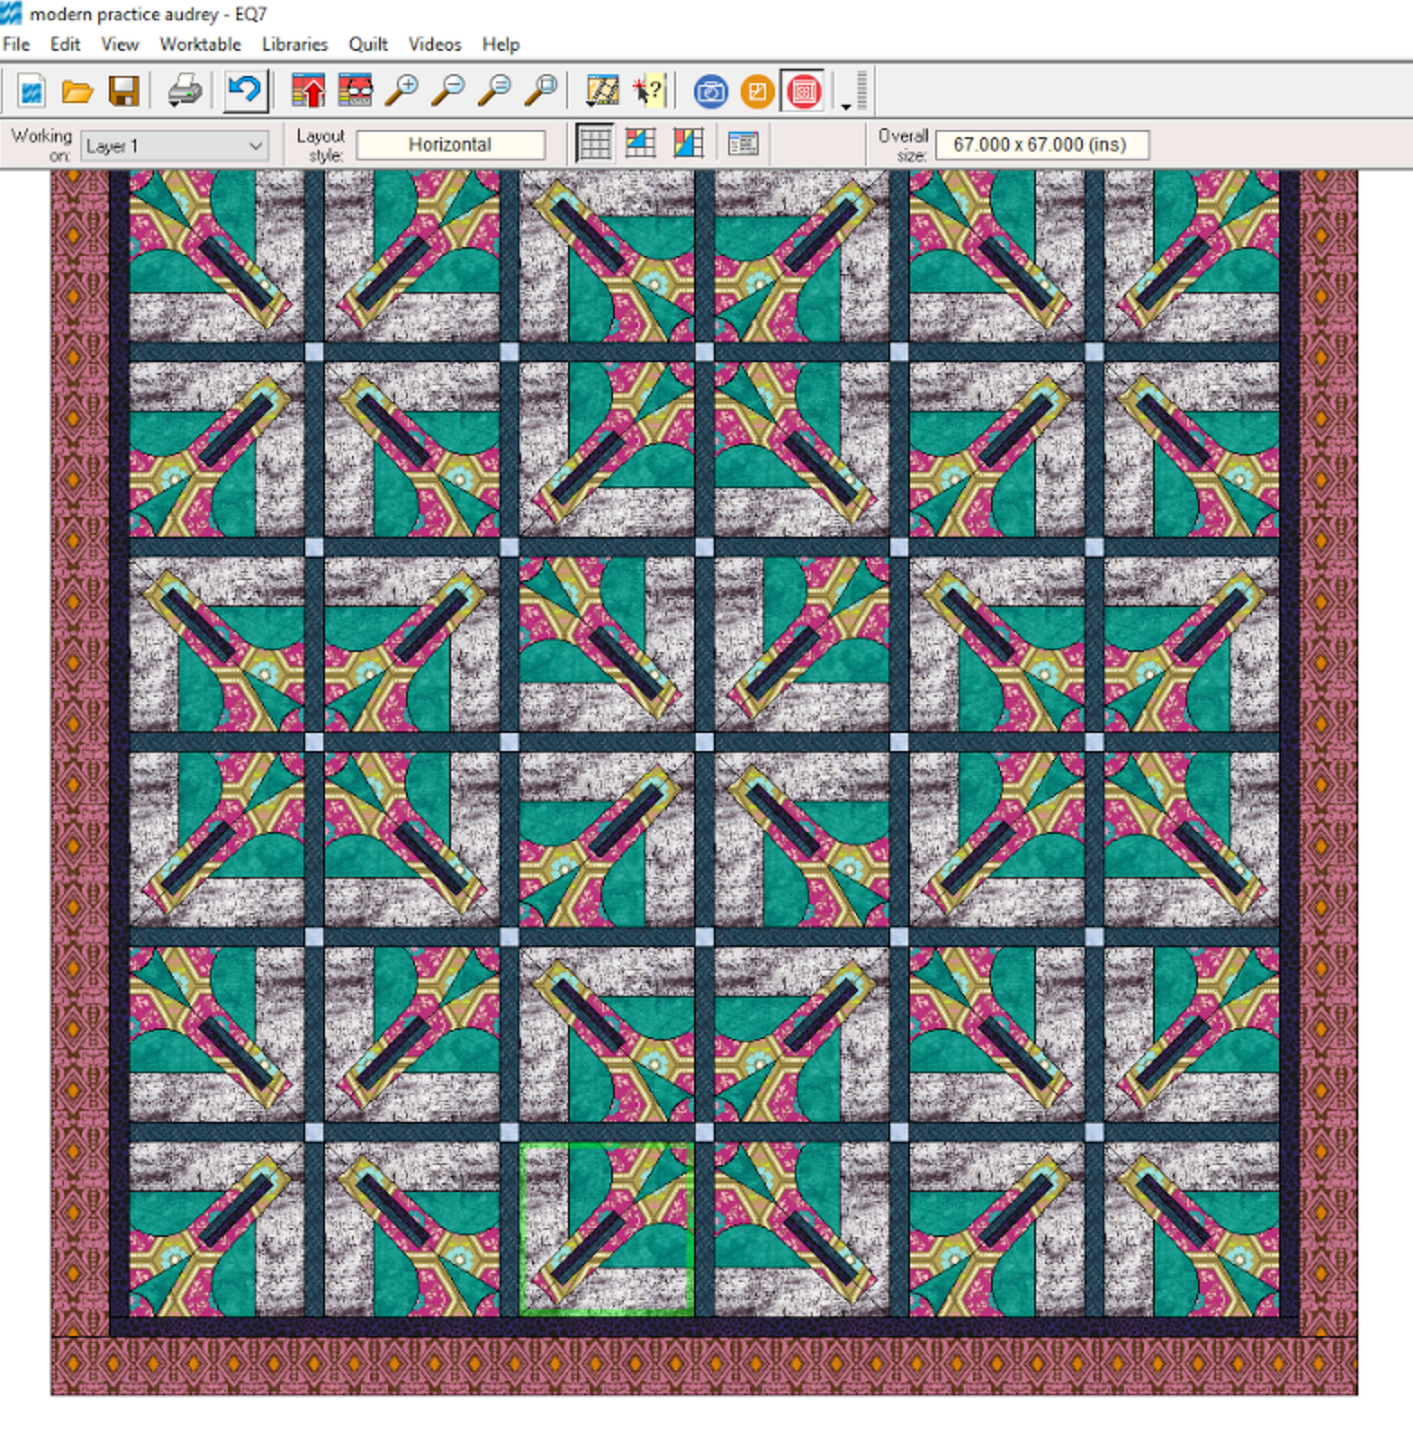 |
| Another screenshot of Carolyn's design made with EQ7 |
With an extensive pattern library of fabrics and colors, you can work out your design and see a graphic image of your finished quilt before you ever pick up your rotary cutter. And your brain can go to lunch while the program calculates yardage and lists out shapes and sizes to cut.
You will still have to do the cutting unless you have something like a Cricut machine. Then all that's left to do is sew! This isn't the cheapest option when it comes to digital quilt design, but you can get in the door for a couple hundred bucks.
Go for a Classic: Photoshop
If you have already have this software, use it to design your quilts! Catherine scans swatches of her fabric and uses Adobe Photoshop magic to visualize different layouts. If you don't have Photoshop you can get similar results with Photoshop Elements. Early versions like PE3 often have free trial periods.
What's YOUR favorite computer software program for quilt design? Let us know in the comments!
What's YOUR favorite computer software program for quilt design? Let us know in the comments!
Keep this on your radar...
- Curves Challenge quilts are due at our November 11 guild meeting.
- Mini quilts for the #AZtoTNswap will be arriving soon from the Tucson MQG! Hopefully you already mailed yours to your partner.
- We're looking for next year's guild leaders. Will you be one of them? See Kelly.
- Do you have any ideas for next year's guild charity/education endeavors? Let us know.
Show and Tell
Monday, October 9, 2017
Computer Software for Quilt Design

Join us Saturday, Oct. 14 at 10 a.m. as we explore computer software programs that can help bring your quilt ideas to life.
Vanessa, Carolyn R., Catherine and Stephanie will highlight the capabilities of two popular programs: Electric Quilt and Adobe Illustrator. The group will also provide tips on how to incorporate Adobe Photoshop into your quilt planning.
I look forward to seeing you there!
Monday, September 25, 2017
Curves Challenge

This year's theme is curves. I want you to create an original design for a small, modern quilt using any techniques you see fit. (Recent programs covered several that may help you, including improv piecing, appliqué, and foundation paper piecing.)
Here are the rules:
- Quilt tops must consist of THREE solid fabrics: black, white, and one color of your choice. You must use all three; no more, no less. No prints.
- Finished quilts must be no larger than 36" on any side. Your quilt can be any shape you like, but the maximum size is 36".
If you're on Instagram, share pictures of your progress/process with the hashtag #ChattMQGcurves. When you're finished, label your quilt your name and the quilt's name.
Finished quilts are due at our Nov. 11 guild meeting, and they'll be on display during our Dec. 9 meeting.
I can't wait to see what you make!
Tuesday, September 19, 2017
September Meeting Recap
From Paper to Fabric
Armed with a gridded flip pad and a handful of dry-erase markers--but no calculator--Jean Larson walked us through several examples, showing us her process for converting a sketch to a reproducible quilt block.Math was involved.

Amid cries of "Have you ever heard of Wonder Under!" and "I'd just make templates!" and "Do you know how to paper piece?" Jean persisted, demonstrating a geometrical way to resize triangles and other shapes accurately.
Jean is not one to take the easy way out.
Nor should you be. A brief foray into social media reveals thousands of quilt patterns for sale. You can make your own and you do not need a fancy program to do that (although we will talk about some of those options at our October meeting).
We also learned ways to make reproducible curves using a tool from the dressmaker's arsenal.
Give your brain a workout and see how far you can get with a little push from Jean!
Habitat Quilts
Camille Miller agreed to present a quilt to the new Habitat homeowners at the September 16th dedication ceremony. Our next quilt will be presented in October. And we have two volunteers to thank: new member Beverly Herron is tackling the result of the Cut It Up! Quilt Top Challenge, and Karen Sperry is working magic on the paper-pieced star quilt.
Here are two finished quilts that will be presented to new homeowners later this year:
 |
| This was assembled by Martha G., quilted by Beverly, and bound by Jean. |
 |
| Patricia (left) pieced this top following an Alison Glass pattern; Denise (right) quilted it. |
Show and Tell
Saturday, September 2, 2017
Quilt Design: From Paper to Fabric
Have you ever drawn a modern quilt design and wondered, “Now how in the world am I going to piece that?!” It’s a familiar feeling for many quilters, and one that can bring the creative process to a standstill.
Join us Saturday, Sept. 9 at 10 a.m. as Jean Larson walks us through steps to analyze and deconstruct a design and translate it into fabric. Armed with Jean’s tips and tricks, you’ll leave with confidence to tackle any project.
See ya Saturday!

Friday, August 25, 2017
August Meeting Recap
Program: Curved Piecing
Are you interested in slipping away from the straight and narrow? If you attended our August meeting you saw a handful of different ways to swerve in a new direction. Delores, Vista, Gerry, Julie and Kate teamed up to show us a variety of examples and methods to cut and piece curves into our quilts. We saw modern curves cut with templates or improvisationally, pieced in modern ways, combined with stripes, stretched out on the bias, recut and sewn into checks, hanging by slivers--the ideas were flowing and inspiring. Try out some of their methods and see what you can create!
Guild Survey
Group Quilt in Progress
We have a group quilt in the works. The blocks were improvisationally pieced and quilted individually by Kelly, Jean, Sandi, Mary, Denise, Stephanie, Toni, Theresa, Martha, Karen S., and Karen D. Check out the way the makers used scraps to create richly saturated fabric. We plan to enter the quilt into the 2018 QuiltCon show, so we're keeping the full reveal under wraps for a little while longer. Stay tuned!
Quilt Swap with Tucson
If you are participating in this cross-country swap be sure to post photos of your quilts--both in progress and finished--on the social media platforms of your choice. Be a detective and check out your partner's style. And go see what the members of Tucson MQG are making. The anticipation of wondering which mini will be yours is a huge part of the fun. The AZ guild will ship all their quilts to Chattanooga in a single package in October. When you get your swap quilt finished, bring it back to guild because we want to photo all our makers and their minis before they head west.

Welcome Back, Camille!
Camille Miller, organizer of our swap with Tucson, has returned from Navy boot camp and is now a trained Mass Communications specialist. We are all so proud of Camille, who joined the Navy last year. Guild member Karen Downer surprised Camille (and the rest of us) by presenting her with a Quilt of Valor made by area quilters. As Karen and Jackie Cory wrapped Camille in her quilt, guild members quickly rose to give Camille a standing ovation, and there were quite a few misty eyes around the room. Now that she's back and working in Chattanooga, Camille will be able to join us for most of our meetings.


Thank you, Habitat Quilters
We have several guild members and friends working hastily to finish out our Habitat quilts to be donated this fall. Jan Webster, Cendi Adcock, Gerry Haywood, Martha Griffin, Beverly Herron and Karen Sperry all deserve our grateful thanks.
The next Habitat dedication is scheduled for 10:00AM on September 16, the day of our next guild meeting. Jean Larson always covers Habitat when she can't find a volunteer, but Jean will be busy presenting our program next month. If you know of someone who could do this for us, please contact Jean or Kelly and let them know.
Show and Tell
Subscribe to:
Posts (Atom)